이클립스에서 opencv 추가하기

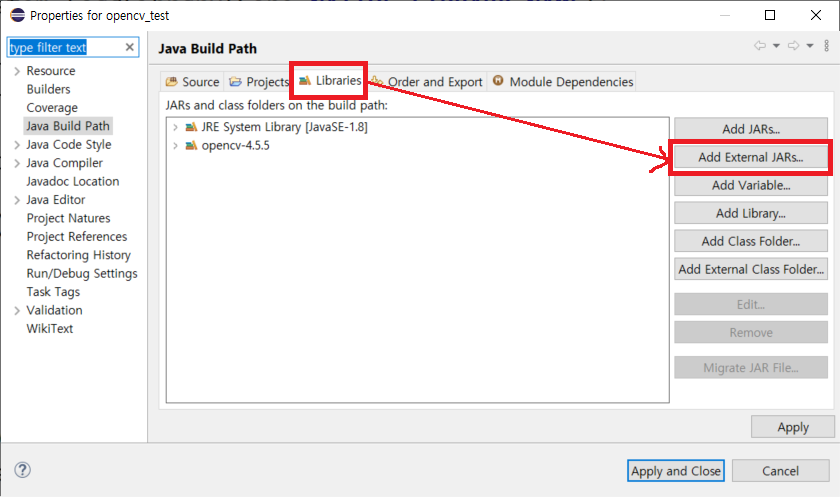
다음과 같이 opencv_test라는 프로젝트가 있을때 마우스오른쪽 -> Properties 선택

Libraries 탭에서 Add External JARs... 선택

C:\opencv\build\java 경로에 있는 opencv-455.jar 추가 (현재 설치되어 있는 opencv 4.5.5)

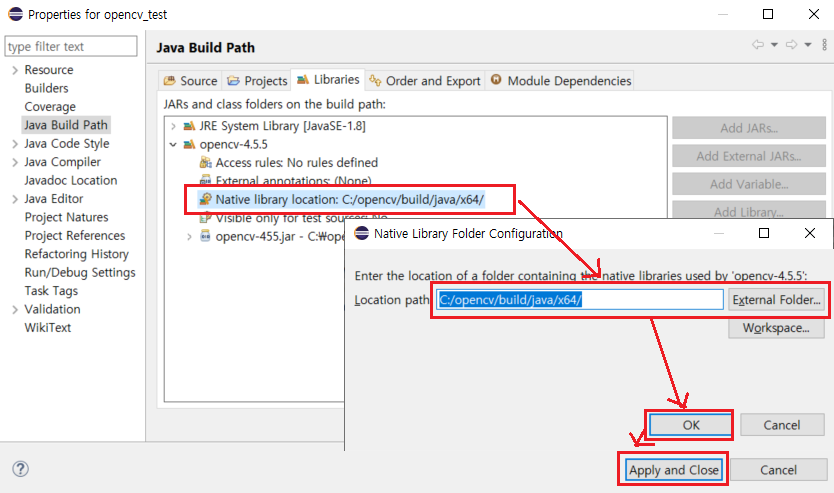
추가된 opencv 라이브러리에서 Native library location 에 opencv_java455.dll이 위치한 파일 경로 지정

프로젝트에 opencv가 추가되어 있음

이미지 띄우기 - import는 자동으로 추가하시길 바람
public class opencv_run {
 public static void main(String[] args) {

	 // opencv 라이브러리를 읽어오기
	 System.loadLibrary(Core.NATIVE_LIBRARY_NAME);

	 // 원본이미지 파일 읽어오기
	 String img_path = "src/opencv_test/images/aaa.jpg";
	 Mat img_src = Imgcodecs.imread(img_path);
	 if(img_src.empty()){
		 System.out.println("Could not read the image "+ img_path);
		 return;
	 }
	 // 이미지 결과 출력
	 HighGui.imshow("Original Image", img_src);

     // 아무키나 누르면 종료, s키를 누르면 파일 저장
     int k = HighGui.waitKey(0);
	 if(k == 's' || k == 'S'){
		 String imgFileName = "src/opencv_test/images/result.jpg";
		 Imgcodecs.imwrite(imgFileName, img_src);
	 }
	 System.exit(0);
 }
}
불러온이미지를 Gray로 변환하기
public class opencv_run {
 public static void main(String[] args) {

	 // opencv 라이브러리를 읽어오기
	 System.loadLibrary(Core.NATIVE_LIBRARY_NAME);
	 // 원본이미지 파일 읽어오기
	 String img_path = "src/opencv_test/images/aaa.jpg";
	 Mat img_src = Imgcodecs.imread(img_path);
	 if(img_src.empty()){
		 System.out.println("Could not read the image "+ img_path);
		 return;
	 }

	 // 이미지 결과 출력
	 HighGui.imshow("Original Image", img_src);

	 // 이미지를 Gray로 바꾸기
	 Mat img_gray = new Mat(img_src.rows(),img_src.cols(),img_src.type());
	 Imgproc.cvtColor(img_src, img_gray, Imgproc.COLOR_BGR2GRAY);
	 HighGui.imshow("Gray Image", img_gray);

	 int k = HighGui.waitKey(0);
	 if(k == 's' || k == 'S'){
		 String imgFileName = "src/opencv_test/images/gray_result.jpg";
		 Imgcodecs.imwrite(imgFileName, img_gray);
	 }
	 System.out.println(String.format("%c", k));
	 System.exit(0);
 }
}'PROGRAM > OpenCV' 카테고리의 다른 글
| OpenCV-Java #3 원 찾기 (0) | 2022.06.08 |
|---|---|
| OpenCV-Java #2 동영상 / 카메라 제어 (0) | 2022.06.07 |
| Contour 최대 최소값 찾기 (0) | 2021.04.02 |
| Object Tracking (0) | 2021.01.12 |
| pyQt5 + cv2.findContours (0) | 2020.06.11 |


