MyAlarm 구현하기
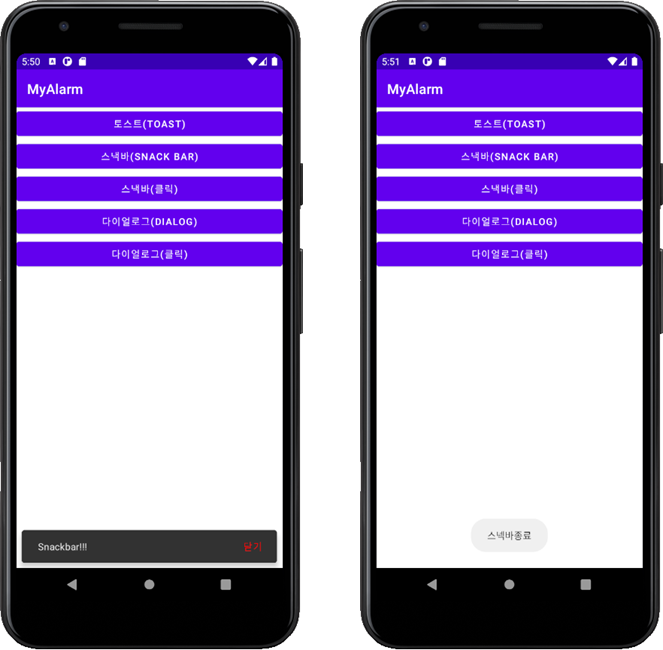
완성된 화면 구성
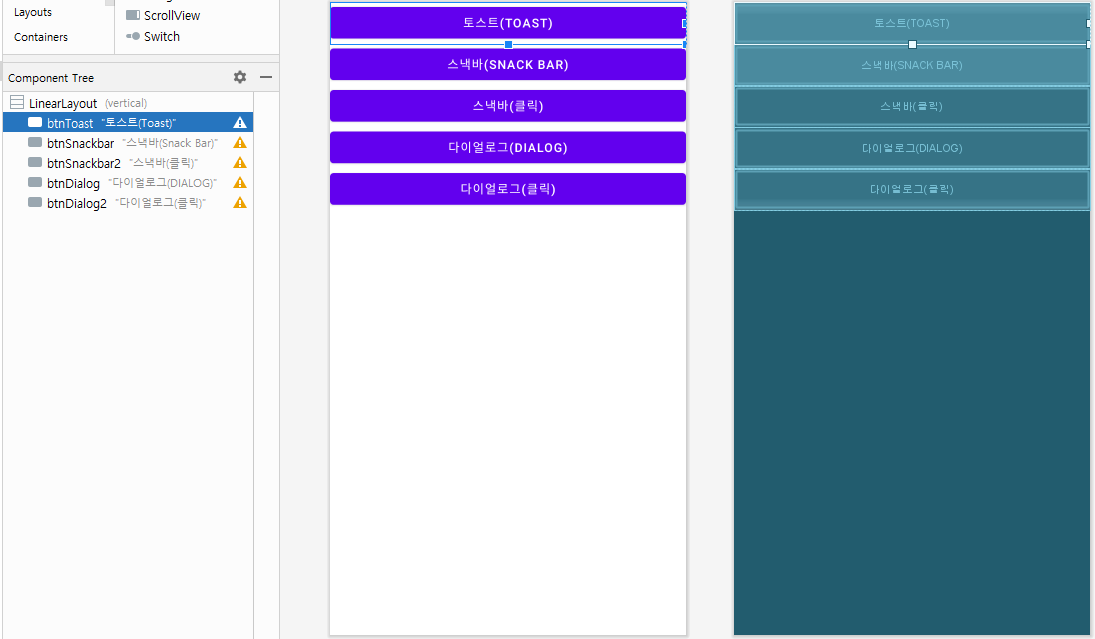
- 토스트 / 스넥바 / 스넥바(클릭) / 다이얼로그 / 다이얼로그(클릭) 형태로 버튼 생성
- 각 버튼 클릭하면 결과 출력

화면 구성하기
- 버튼1 : btnToast / 토스트(TOAST) 출력
- 버튼2 : btnSnackbar / 스넥바(SNACK BAR) 출력
- 버튼3 : btnSnackbar2 / 스넥바(클릭) 출력
- 버튼4 : btnDialog / 다이얼로그(DIALOG) 출력
- 버튼5 : btnDialog2 / 다이얼로그(클릭) 출력

activity_main.xml
<?xml version="1.0" encoding="utf-8"?>
<LinearLayout xmlns:android="http://schemas.android.com/apk/res/android"
    android:layout_width="match_parent"
    android:layout_height="wrap_content"
    android:orientation="vertical">

    <Button
        android:id="@+id/btnToast"
        android:layout_width="match_parent"
        android:layout_height="wrap_content"
        android:text="토스트(Toast)" />

    <Button
        android:id="@+id/btnSnackbar"
        android:layout_width="match_parent"
        android:layout_height="wrap_content"
        android:text="스낵바(Snack Bar)" />

    <Button
        android:id="@+id/btnSnackbar2"
        android:layout_width="match_parent"
        android:layout_height="wrap_content"
        android:text="스낵바(클릭)" />

    <Button
        android:id="@+id/btnDialog"
        android:layout_width="match_parent"
        android:layout_height="wrap_content"
        android:text="다이얼로그(DIALOG)" />

    <Button
        android:id="@+id/btnDialog2"
        android:layout_width="match_parent"
        android:layout_height="wrap_content"
        android:text="다이얼로그(클릭)" />
</LinearLayout>
다섯메뉴 클릭 이벤트 작성하기
- MainActivty에 View.onClickListener 를 구현(implements)한다.

- onClick 메서드를 구현

- 29번 라인에서 onClick가 override됨

- onClick( ) 안에서 v.getId( ) 의 값에 따라 if문으로 구현
MainActivity.java
public class MainActivity extends AppCompatActivity implements View.OnClickListener {

    @Override
    protected void onCreate(Bundle savedInstanceState) {
        super.onCreate(savedInstanceState);
        setContentView(R.layout.activity_main);
        setButton();
    }

    private void setButton() {
        findViewById(R.id.btnToast).setOnClickListener(this);
        findViewById(R.id.btnSnackbar).setOnClickListener(this);
        findViewById(R.id.btnSnackbar2).setOnClickListener(this);
        findViewById(R.id.btnDialog).setOnClickListener(this);
        findViewById(R.id.btnDialog2).setOnClickListener(this);
    }

    @Override
    public void onClick(View v) {
        if (v.getId() == R.id.btnToast) {
            Toast.makeText(getApplicationContext(), "TOAST!!!", Toast.LENGTH_SHORT).show();

        } else if (v.getId() == R.id.btnSnackbar) {
            Snackbar.make(v, "Snackbar!!!", Snackbar.LENGTH_SHORT).show();

        } else if (v.getId() == R.id.btnSnackbar2) {
            Snackbar.make(v, "Snackbar!!!", Snackbar.LENGTH_INDEFINITE)
                    .setAction("닫기", new View.OnClickListener() {
                        @Override
                        public void onClick(View view) {

                        }
                    }).setActionTextColor(Color.RED).show();

        } else if (v.getId() == R.id.btnDialog) {
            new AlertDialog.Builder(this)
                    .setIcon(R.mipmap.ic_launcher)
                    .setTitle("Dialog")
                    .setMessage("메시지를 보여줍니다!!")
                    .setNeutralButton("닫기", null)
                    .setPositiveButton("네", null)
                    .setNegativeButton("아니오", null)
                    .show();

        } else if (v.getId() == R.id.btnDialog2) {
            new AlertDialog.Builder(this)
                    .setIcon(R.mipmap.ic_launcher)
                    .setTitle("Dialog")
                    .setMessage("메시지를 보여줍니다!!")
                    .setNeutralButton("닫기", new DialogInterface.OnClickListener() {
                        @Override
                        public void onClick(DialogInterface dialogInterface, int i) {
                            Toast.makeText(getApplicationContext(),"다이얼로그를 닫습니다.",Toast.LENGTH_SHORT).show();
                        }
                    })
                    .show();
        }
    }
}
스넥바(클릭)

- onClick 메서드 안에 수행할 명령을 작성하면 된다.
else if (v.getId() == R.id.btnSnackbar2) {
	Snackbar.make(v, "Snackbar!!!", Snackbar.LENGTH_INDEFINITE)
    	.setAction("닫기", new View.OnClickListener() {
    		@Override
    		public void onClick(View view) {
        		Toast.makeText(getApplicationContext(), "스넥바종료", Toast.LENGTH_SHORT).show();
       		}
        }).setActionTextColor(Color.RED).show();
}
Dialog에서 클릭 메서드 수행

else if (v.getId() == R.id.btnDialog) {
    new AlertDialog.Builder(this)
            .setIcon(R.mipmap.ic_launcher)
            .setTitle("Dialog")
            .setMessage("메시지를 보여줍니다!!")
            .setNeutralButton("닫기", null)
            .setPositiveButton("네", new DialogInterface.OnClickListener() {
                @Override
                public void onClick(DialogInterface dialog, int which) {
                    Toast.makeText(getApplicationContext(),"\"네\"를 선택",Toast.LENGTH_SHORT).show();
                }
            })
            .setNegativeButton("아니오", new DialogInterface.OnClickListener() {
                @Override
                public void onClick(DialogInterface dialog, int which) {
                    Toast.makeText(getApplicationContext(),"\"아니오\"를 선택",Toast.LENGTH_SHORT).show();
                }
            })
            .show();

}'PROGRAM > Android' 카테고리의 다른 글
| myCalc App (1) (0) | 2021.04.20 |
|---|---|
| EditText, TextView, Button and Toast (0) | 2021.04.20 |
| App 처음 만들기 - HelloAndroid (0) | 2020.10.21 |
| Android Studio 4.1 Installation (0) | 2020.10.19 |
| MyMemo exam (0) | 2020.05.30 |


